
If you find yourself locked out of your Windows account, don’t worry—there’s a reliable way to reset your password and regain access. In this guide, we’ll walk you through the process of using a Windows installation USB.
Note: This method does not work if the account is signed in with a Microsoft Account.
You can also reset your password by holding Shift on the sign-in page, selecting Restart, and accessing the UEFI options to open Command Prompt. Let’s dive into these easy steps to unlock your Windows!


Step 1: Insert the Windows USB
Start by making sure you have a Windows installation USB. This can be created using another computer if necessary. Once you have it ready, insert the USB into the locked computer. You may need to restart the computer and ensure it boots from the USB. To do this, you may need to enter the BIOS or UEFI settings (usually by pressing F2, F12, Delete, or Esc during startup) and set the USB as the primary boot device.
Step 2: Access Command Prompt via the USB
After booting from the USB, you’ll see the Windows Setup screen. Here, select your preferred language, time, and keyboard method. On the same screen, press Shift + F10 simultaneously. This keyboard shortcut opens the Command Prompt window, which is a powerful tool that allows you to execute commands to manipulate system files.

Step 3: Open Diskpart Utility
In the Command Prompt window, type the following command and press Enter:
diskpart
This command opens the Disk Partition utility, allowing you to manage disk volumes on your system.
Step 4: List Your Disk Volumes
Once you’re in Diskpart, type:
list volume
and press Enter. This command displays all the disk partitions on your computer. Look for the volume that contains your Windows installation—this is usually labeled as Volume C. Take note of the letter associated with your Windows volume.
Step 5: Navigate to Your Windows Volume
Next, you need to switch to the Windows volume. If, for example, your Windows installation is on Volume C, type: C:
Then press Enter. You should now be in that volume.
Step 6: Access the System32 Directory
To reach the necessary files for password reset, type the following command:
cd windows\system32
and press Enter. This command changes your current directory to the System32 folder, where essential Windows files are stored.
Step 7: Backup and Replace Important Files
Now, we will create backups and replace a couple of key files to enable the Command Prompt at the login screen.
- Backup Utilman.exe: This utility allows access for those needing assistance at the login screen. Type the following command to create a backup of this file:
copy utilman.exe utilman1.exe
You should see a message indicating 1 file(s) copied if successful.
- Backup cmd.exe: Next, make a copy of the Command Prompt executable:
copy cmd.exe cmd1.exe
Confirm that it also says 1 file(s) copied.
- Delete Utilman.exe: Now, remove the original Ease of Access file:
del utilman.exe
- Rename cmd.exe to Utilman.exe: Finally, rename the Command Prompt executable to replace the utility:
rename cmd.exe utilman.exe
Step 8: Exit Command Prompt and Setup
Once you’ve made these changes, type:
exit
to close Command Prompt. Then, proceed to exit the Windows installation setup. Your computer will restart, and you should see the Windows login screen.
Step 9: Open Command Prompt from the Login Screen
When the login screen appears, look for the Ease of Access icon located in the bottom-right corner. Click it. Instead of the Ease of Access utility, this will now open Command Prompt.
Step 10: Reset the Password Using User Accounts Control
In the Command Prompt window that appears, type the following command and press Enter:
control userpasswords2
This command opens the User Accounts dialog, allowing you to manage user accounts on the system.
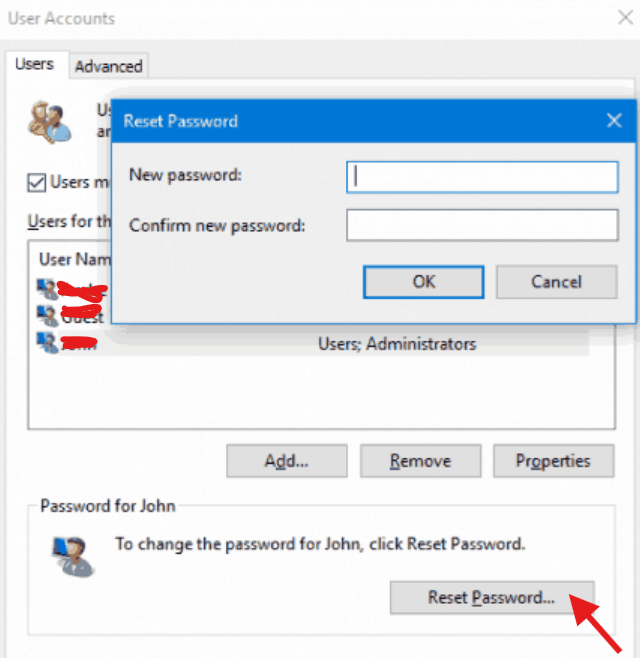
- Select the Locked User Account: In the User Accounts window, you will see a list of all user accounts on the system. Click on the account you want to reset the password for.
- Reset the Password: After selecting the user, click on Reset Password…. Follow the prompts to enter a new password and confirm it. Once done, click OK to save the changes.
Step 11: Restore Utilman.exe
For security reasons, it’s essential to restore the original Utilman.exe file. To do this, repeat the steps to access Command Prompt via the USB, navigate to the System32 directory again, and run the following commands:
- Restore Utilman.exe:
   del utilman.exe
   rename utilman1.exe utilman.exe
- Exit: Type
exitto close Command Prompt.
Alternative Method: Accessing Command Prompt via UEFI Options
If you prefer not to use the USB, you can reset your password directly from the sign-in page. Here’s how:
- On the Windows login screen, hold down the Shift key on your keyboard.
- While holding Shift, click on the Power icon in the lower right corner.
- Select Restart from the menu that appears.
- Your computer will reboot and take you to the Choose an option screen. Select Troubleshoot, then Advanced options, and finally Command Prompt.
- From there, you can follow the same steps as above to reset your password.
Conclusion
Congratulations! You have successfully reset your Windows local user password using a Windows installation USB or through UEFI options. You can now log in with your new password. Remember, it’s always a good practice to keep your passwords secure and consider using password managers for easier management.
For more helpful tips and tricks related to cybersecurity, visit SECCYBERNET.com.

Leave a comment